Category: On the Cheap

Bench makeover: before & after

Makeover Monday: Coffee Table

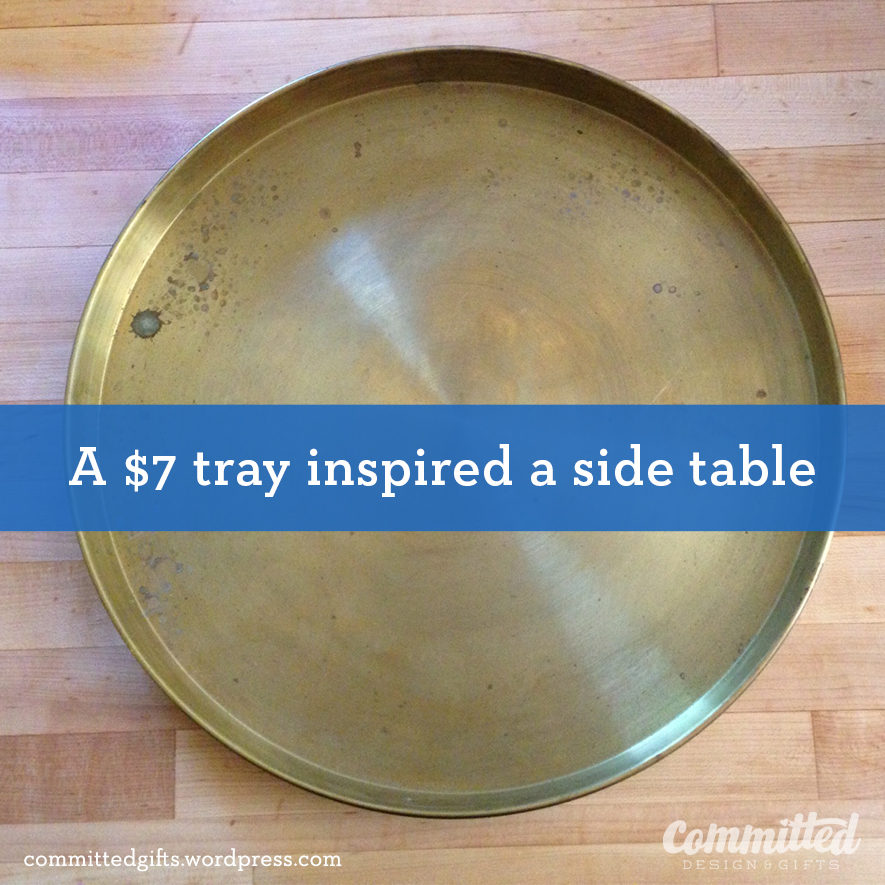
Some people like to rescue stray puppies, I rescue stray furniture. I see it on the street, “FREE” sign hanging limply to the side, waiting for a loving home. So I bring it home, I clean it up, feed it well, love it, and turn it into part of our family.

Because I tend to rescue LOTS of things, I received the edict from my husband not to rescue anything else until I’d rehabilitated what I’d already accumulated. That was incentive enough to get started.

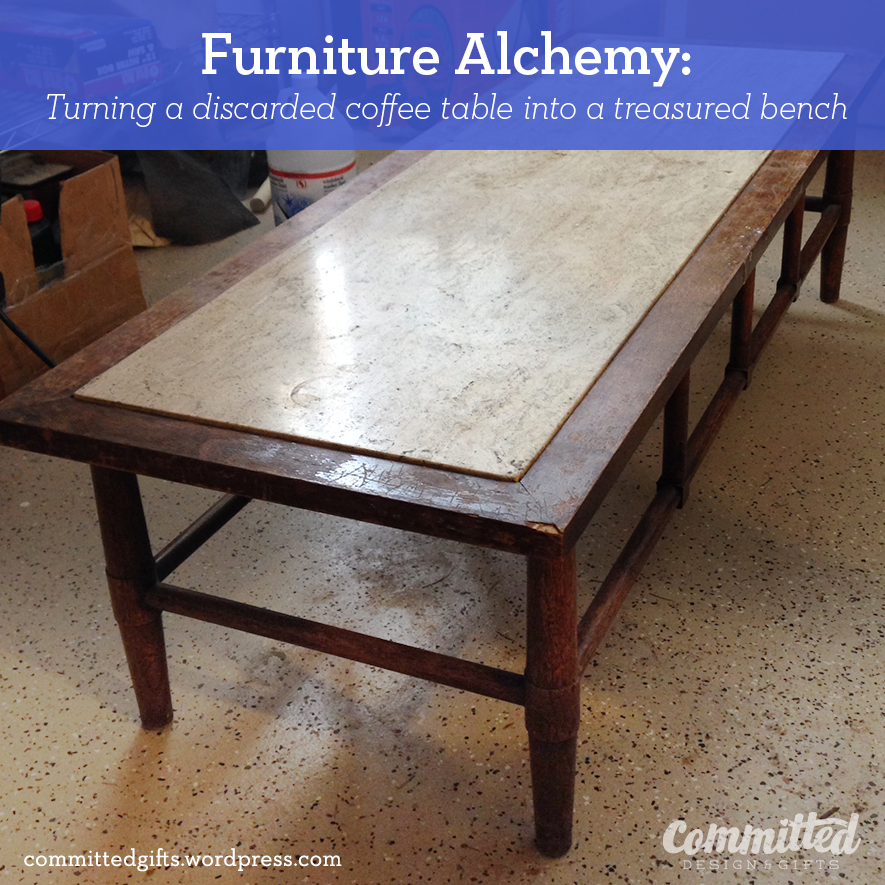
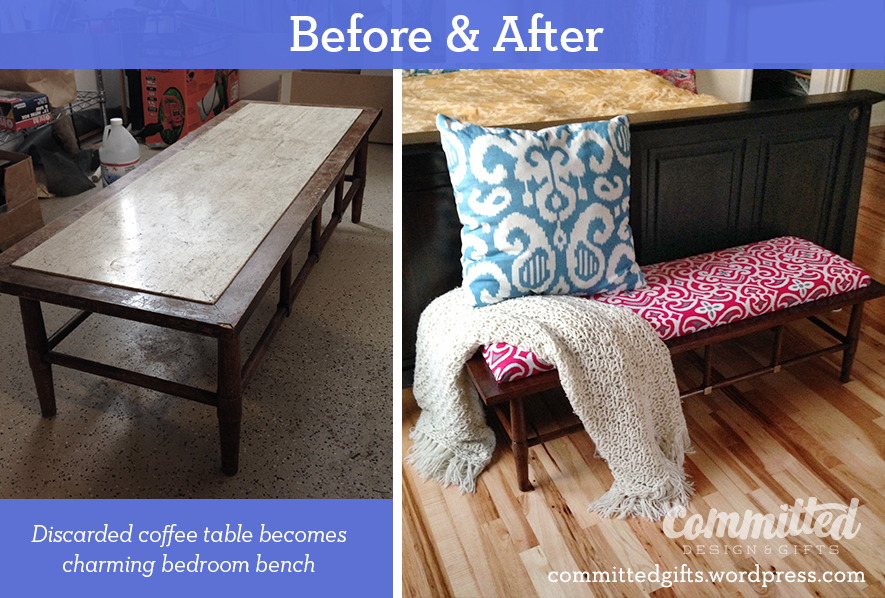
A couple of weeks ago, my sister and I found this coffee table on the curb. It had cool lines, was in fine structural shape aside from the cracked marble top, and just needed some refinishing. So we hauled it home. I had a while to think about it, and when I pulled out the marble, it occurred to me to make an upholstered seat and turn it into a bench for the end of our bed.

Furniture makeover: bench
A stray coffee table on the street becomes a beloved bench in our home.

Continue reading “Makeover Monday: Coffee Table”

Are You Orna-Mental?!?

I don’t know if you get a little freaked out by figuring out appropriate gifts for everyone, but I do. The big question on my mind this week was what to do for my daughter’s daycare class.
I tend to get a little OCD and go overboard for acquaintances, which I’ve learned can come off as overbearing or even overwhelming. Trying to come up with something that’s kind, thoughtful, dietary-friendly, not too difficult to make, but not boring is tough!

DIY ornament gift
PROS: cheap, easy, non-allergenic, kid-helpable, non-denominational. CONS: None! Especially if you love glitter on everything!

It hit me in a flash: initial ornaments! At JoAnn fabrics, they have cute balsa wood letters for $1.35. I picked up some sparkle paint, purple glitter, and gold cord for hanging. The only real work was drilling the holes, which I did while kiddo was at school. The backs splintered a little around the holes, but filled in nicely with glitter! So we painted, glued, and glittered for about 10 minutes, and were DONE! After it dried, I tied on the gold cord with a simple gift tag (left over from my business card project). Voila! Glitter bombed, but a simple gift for any denomination.
What are your favorite mass gifts you like to give (or have received)?

Committed garden stairs

Flame Weeding: Organic Weed Killing for Badasses

The ongoing saga of our yard is this: it’s big, it’s overgrown, and it’s overwhelming.

We paid mucho dinero to have the yard weeded and trimmed back, and true to form, six weeks later, that work was completely undone. It’s not that the area is that large, it’s just a lot of varied spaces, a challenge to access, and rife with invasive, aggressive species. Since I didn’t want to pay basically RENT to have someone do this job every month, I turned to the internet for ideas.

Committed garden stairs
Watch it bring you to your knees, knees.

Luckily, my friends are smart. They referred me to Seattle Tilth. They offer a great service: garden consultations to identify plants, generate a plan, and help figure out organic solutions to turn your garden into something sustainable. To me, “Sustainable” doesn’t just mean organic, it means something that I can actually take care of with reasonable effort.

Many of the ideas she gave me were great, especially flame weeding. It’s exactly how it sounds: kill weeds with FIRE! Yeah! Continue reading “Flame Weeding: Organic Weed Killing for Badasses”

Gift tag business cards.

Crafted Connections (and a DIY Business Card Tutorial)

I should be a self-help junkie. I love going to events, getting sparked by a lecture, meeting fascinating people and gleaning knowledge from their stories. But I’m not a kool-aid drinker…yet. Last night I attended Crave’s Urban Campfire, where incredible women opened their hearts and shared their vulnerability to empower the rest of us. (Okay, I sound like a kool-aid drinker for sure.)

I want to process some of what I learned in that event before I write about it, so I thought I could at least share with you my process for making my own business cards.

But I can get cards on VistaPrint for like free, right? Yes, but as a designer and whatever else I am (still figuring that out…cough…cough), it doesn’t reflect ME to do that. I make stuff. I solve problems.  If you are in a creative industry, or thinking about getting into one, perhaps you can think beyond the card too!

I also disobey the rules and change the look of my cards and online presence ALL THE TIME. I don’t think there’s anything wrong with it, since to be honest, I’m still figuring out who I am and what I do (or really, what skills I have that I want to sell). So, enough kool-aid, on to the tutorial…

I decided a few months ago to try using stickers as my card. I remember seeing a designer who had taken other peoples’ old business cards and slapped a sticker with his information on them–the ultimate in recycling. It appealed to my inner greenness and opened up some possibilities.

So I whipped up a pattern, printed on both sides of Bristol board, then printed stickers on the full-sheet Avery labels, and made these:

First try at DIY business cards
Too much cutting, not enough time.

Cute, but SUCH a time-consuming venture. Plus, the white of the sticker was a little transparent, which meant that I could see the pattern through the logo side. It wasn’t exactly right for me. My final complaint? The pattern wasn’t as vibrant as I wanted. I like to think of Committed as colorful and fun. This fell a little short. Luckily, DIY means small quantities, so no harm, no foul.

Moving on.

Upcycled business cards.
Next attempt: upcycled pulpboard with ribbons.

I had a bunch of pulpboard lying around, and figured, hey, let’s use it! So I went bolder with the colors, and added a ribbon, since hey, it’s cute, and my domain name is Committed GIFTS. Gift tag, get it?

Even though I LOVED how these turned out, they were a colossal pain in the ass. (That’s P.I.T.A. for short). I used the same Avery labels, which required tons of slicing. The cardstock was so thick, it took several passes to cut, then the ribbons were slippery. In the end, they were so thick, I could only gracefully carry a few around at a time. It wasn’t worth it.

FINALLY…

I figured it out. Buy PRE-CUT stuff, Smarty! The cutting was the biggest time-suck. You can learn from my mistakes! This is easy, and really cute. Plus, you could do this for actual gift tags, mommy cards, basically anything. Easy easy easy.

Materials (I’m linking to these on Amazon, but they are not affiliate links, for reference only):

I have 10 years in graphic design and mockup experience. All of these tools are incredibly useful in making a clean, crisp product. It takes practice and patience, but when you get the hang of cutting and folding carefully, you can make it look like it wasn’t handmade.

Tips:

  • Alwaysuse a fresh blade. As soon as they start to get dull, swap them out. They tear your precious printouts and take more of your time. Isn’t it worth the extra 10 cents to do it right?
  • Hold the ruler upside-down (smooth side down) and press down hard to get a perfect straight edge for cutting and folding. When you place it cork-side-down, the gap allows your blade to travel side to side a little. If you make more than one pass, you end up with slivers of paper.
  • Be gingerly. Don’t cram your blade in and go for it. Take a couple of light passes to make your cuts. You’ll get a feel for how deep to go to get a nice edge.
  • Practice printing on regular paper to make sure everything lines up. Then set your print settings to “highest quality” and make sure you’re feeding the sticker sheet properly.

Tutorial:

Print your stickers first. Use high quality settings.

To fold the stickers in the right place, line your ruler up with the fold and stick it through the paper at the top and bottom.

Mark the fold.
Mark the fold on your printout.

Flip the sheet over, line the ruler up again, and score the page. Hold your ruler down tight, and press the bone folder (or credit card) against the edge. Take a few passes to get a nice score.

Score the back by pressing down with the bone folder. Use the ruler as a guide.

Keep that ruler in place! Take your bone folder and slide along the underside of the sheet to start to fold it up. Do this in several steps, as folding too quickly can cause the printout to crack.

Folding.
Take several passes to fold the sheet.

Flip over the sheet.

You’ll notice that the edges of the stickers may not have printed. Not to worry, we’re slicing those off.

Hold your ruler down (face down) along the edge to slice. Use your Exacto knife carefully and take 2-3 passes to slice each edge.

Slicing your stickers.
Flip it over, and slice the rounded edges off.
Stickers are prepped.
Folded, trimmed, and ready to paste!

See how helpful that all was? You successfully prepped 20 stickers in just a couple of steps. This was seriously SO MUCH FASTER than how I was doing it before. At this point, I grabbed a stack of tags and sliced off the string that came with them. I didn’t think it added anything (I mean, it’s no magenta ribbon, right?) and moved on to sticking the stickers on the cards.

Okay, now line up the fold of your sticker with the edge of the card. You can eyeball it for centering.

Sticking the sticker to the card.
Eyeball it to center it.

It’s not PERFECTLY centered, but it’s so close. The important part is to not have your sticker hanging off the edge at some weird angle.

Gift tag business cards.
Finished! Gift tag business cards!

And there you have it! I like the unique shape of the tags, and the color shift from front to back. It was tough to decide what to include on the cards, but as you can see, I focused on social media touch points for these.

As I said, these can be for actual gift tags…or even to label your kool-aid.

A final note: I’m not including a template because (a) Avery has the tools you need to design these online or in Word or Illustrator and (b) this was a custom project. Who you are and what you want to say about yourself should be unique to YOU. So go to town! Design something awesome!

Thriftaholism: There is No Cure

Hi, I’m Jen. And I’m a Thriftaholic.

After discovering the awesomeness that is the Goodwill in my new ‘hood, I find myself wandering over there 1-2x/week.  This is an addiction I have no desire of curing, however. I abide by a few rules in my prowling:

– Will it serve a function in our home?

– Is it reasonably priced? (Sometimes they price things almost the same as, if not more than, retail).

– Will it add clutter or will it bring joy?

I believe I’ll be posting more and more about my finds. I’m realizing that I am a staunch believer in thrifting. I feel it encourages creativity and responsibility by reducing waste and requiring some thought about how to use something in a new way.

Case in point: my new Moroccan-inspired side table.

I found this gorgeous brass tray from Turkey for $6.99, and immediately thought: wouldn’t this make a great table top?

Brass tray makes a table top.
Tray chic! Just needed a little TLC.

Continue reading “Thriftaholism: There is No Cure”

Sure-Fire Picture Hangin’

We’ve been in the new house for a month now, and I’ve learned that we’ve already established new habits. In our old house, we had one door to get in the house. This was great for organization, because I was able to create a “landing strip” for our keys, mail, and other stuff that comes in the house.

One place for keys and mail
Behold the glory of the single “landing zone.”

I’m pretty proud of this project, and should probably post before and after pics in another post.

Back to the new house: now we have a house with a front door AND a garage door. And now I come in the garage 90% of the time, which is 2 rooms away from the front door. So what happens when I come in with arms full of crap? It all lands on the kitchen counters, dining chairs, and kind of everywhere. Continue reading “Sure-Fire Picture Hangin’”

Silicone ice molds

Ice Fishing, Bath-Style

The last week has been a torrent of tears at bathtime. My husband’s mostly…just kidding…kind of.

But seriously, for some reason, the kiddo just keeps FREAKING OUT when it’s time to splash around. And we need to do it–with the hotter Seattle days, sweat and sunscreen and general toddler messiness require daily hair washing. Or at least rinsing. Anyway, we took a nice long walk this weekend and stopped in an adorable gift shop to browse. I saw these fish ice cube trays and it hit me: I could make colored ice fish for the bath! Thunder struck, the heavens opened, and I was overjoyed at the prospect of a peaceful bath that night.

Silicone ice molds
Water, food coloring, and silicone molds are my gateway to bathtime happiness.

Continue reading “Ice Fishing, Bath-Style”

Finger painting for toddler

Finger Painting for Neat Freaks

We’ve got some gorgeous weather happening in Seattle right now, which means lots of fun outdoors. But sometimes, we gotta eat. Which means kiddo is restless and unoccupied for about 10 minutes while we get meals together. Enter this:

Finger painting for toddler
Occupy your toddler with minimal chaos and destruction!

I found this brilliance on Pinterest, and couldn’t wait to try it. I could only find one color of finger paint, so I added a few drops of blue food coloring for interest. I think it helped thin out the paint so it would squish and swirl more. Just add a few blobs of finger paint to a gallon-size freezer bag, squeeze out the air, seal, and tape all edges to a window. I say tape all the edges because as the kiddos get older, they like to peel, pull, and basically destroy everything they get their hands on! We did get a hole in ours, but patched with more packing tape and it was fine. We had fun stamping footprints, handprints, and even stamping shapes with some of our Melissa & Doug play dough tools.

Oh, and PS–make sure their nails are trimmed. We went back for a second round and Wolverine’d that bag up pretty good, thus making it messy (but not as messy as regular fingerpainting!)

Happy painting!

Scarf storage solution

A Pain in the Neck: Scarf Storage

Update:

Welcome Pinners! I had no idea this idea would go viral. Thanks for visiting my blog & check out my other well-pinned posts on Traveling with a Toddler  and Family Fitness. Also, follow me on Pinterest, Twitter, and Instagram, or “like” the Committed Facebook page to keep up with new posts!

______~_______~______~_______~______~_______~______~_______~______~_______~_______

I need to preface this post with a statement: I don’t want to pretend that I’m super organized. I’m typically pretty scatterbrained. Case in point: this morning I got the kiddo packed up and ready for school, strapped into the carseat, then I realized I FORGOT TO PUT ON ANY SHOES. Mmmkay? Sure, kiddo had her snacks, her lovey, a toy, extra shoes for water play, diapers, but none of that matters if mommy shows up at daycare barefoot. Sheesh.

Anyway, this post is about getting the craziness under control. As I was unpacking in the new house, I discovered that I have a TON of scarves. I felt like a two-bit magician yanking an endless array of scarves from my magic hat. Except that magic hat was actually a couple of boxes, 2 drawers, and God knows where else I was stashing them. They were a wrinkled mess and I could never find the one I wanted when I wanted it.

In the new house, I want to stick to the mantra “A place for everything and everything in its place,” in the hope of maintaining a wee bit of sanity. Now that we actually have space and tons of storage, there’s no valid excuse to strew crap around the house (not that there was an excuse in the old house either!)

Scarf storage solution
Tame the pain in the neck for under 10 bucks.

So, I bucked up and bought a cafe curtain rod at Target for about $7 (like this one). If your space is narrower, you can also do this with a tension rod. The weight of your scarves ends up being comprable to a shower curtain. (We used a tension rod in my daughter’s closet for the last 2 years and it held up well with the baby clothes!)

It took about 10 minutes to mount to the wall and hang all the scarves. Now it’s a cute blast of color in the closet and I can find that perfect scarf when I need it! Sanity preserved! Now if I can remember my shoes…

Home, Sweet Homework

We are officially moved into our new house!

This truly is our “forever home,” and all three of us are almost giddy every time we walk through the door. There are tons of beautiful features, but mostly it just feels like home. Know what I mean? It was one of those this just feels right kind of places. Another bonus? Projects! Lots of ’em! I’ll be posting things here and there, since we hopped on the project train before even setting foot in the house as owners.

I don’t know what spurred me on, but I had the crazy urge to get shit DONE before we moved in. I guess I just know how crazy and messy life gets with my projects and the toll it would take on the fam (sorry, guys…it’s an addiction!) Plus, I had to promise to ONLY START A PROJECT WHEN THE OTHER ONE WAS FINISHED. This is hard. But I’m doing my best. Anyway, the first project was hiring a painter to do the trim.

Seriously, guys. It was pretty bad. Faux marbling, odd continuity choices, or total emission of paint/finishing altogether. I had 2 days available between getting the keys and getting the cleaners in, so we had to be choosy. I picked the trim in the front room, office, and sitting room. (OMG we have a sitting room! So fancy!)

Faux finish trim color.
I’m a firm believer in contrasting trim. And keeping things simple. And not this.

The pic above is just a teaser–I want to finish those a little more before posting pictures, but I thought you needed to see what we were working with.  Continue reading “Home, Sweet Homework”