Tag: DIY

Before & after

Makeover Monday: Flip the Switch on Switchplates

Paint your switchplates
For about 11 bucks and 2 hours, you can freshen up a room.

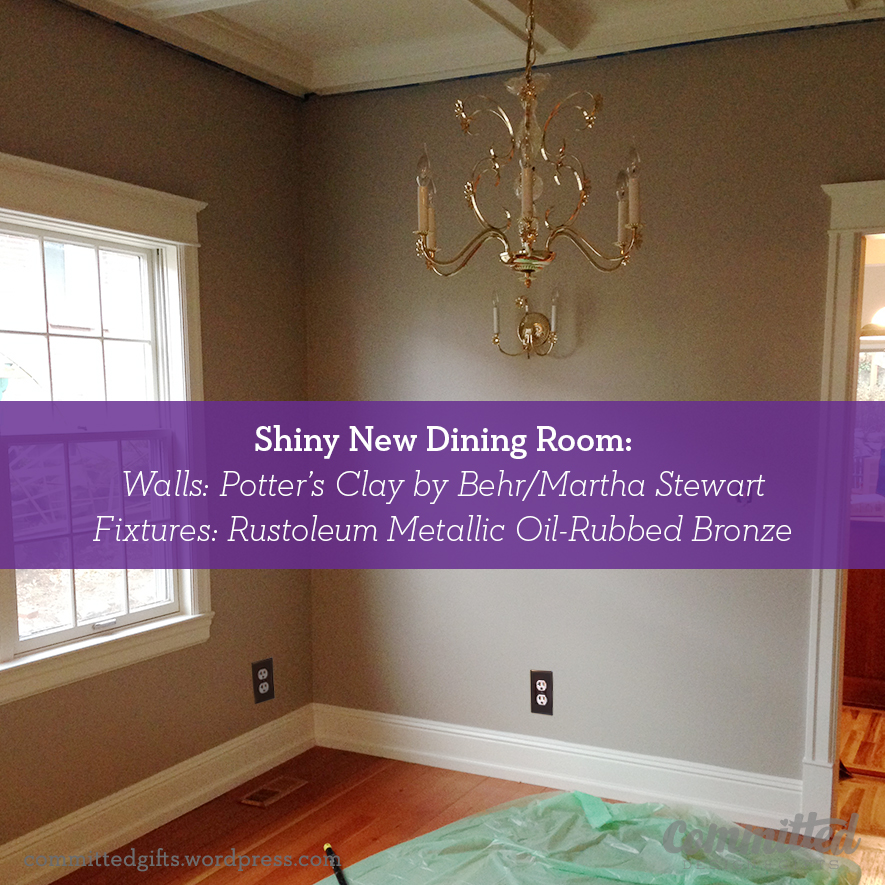
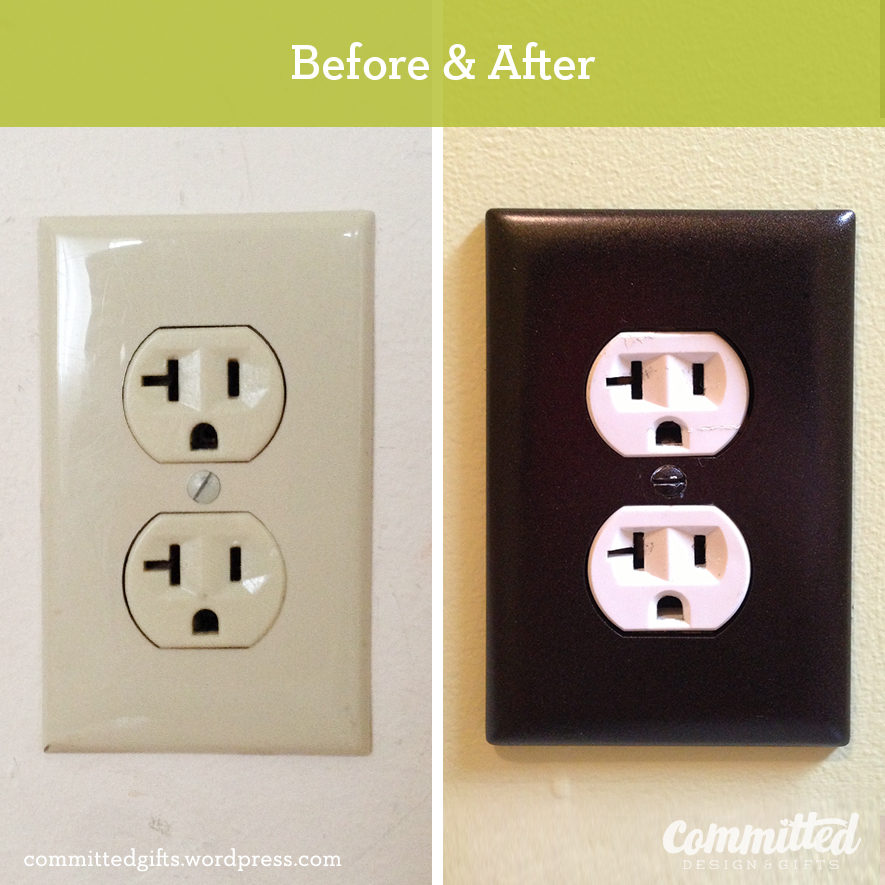
One of my favorite inexpensive makeovers to do for a room is to paint the switchplates. You know, the ugly, yellowing plastic covers for your plugs and light switches? I got this idea because when I touched up our basement, I found that we had like a THOUSAND different switchplates: aluminum, yellowing plastic, grayish plastic, whitish plastic. All of them were beat up and, well, hideous. Replacing all of them would have been pricey and unjustifiable to my husband, who, bless his heart, couldn’t care less about a little detail like that. I like the look of the oil-rubbed bronze, plus we have several light fixtures around the house in that finish. When I looked at buying new ones, the 2-plug covers and light switches were about $3 each, and the specialty multiple plug/light switch combos were $8 or more. Yeah, dumb to pay that much.

Continue reading “Makeover Monday: Flip the Switch on Switchplates”

Free DIY Advent Calendar for Kids

Now that the holidays are over and we’re deep into January gloom, I can reflect on our first Advent-ure with an advent calendar. (See how I did that?) I wish I could tell you that I had a deep understanding of the advent tradition. In my family, it was just a countdown to Christmas. Some years my great aunt would send us a calendar with a little chocolate behind each day, and most years, we’d move a small teddy bear around an advent quilt. Since I didn’t want to get the kiddo all sugared up every night before bedtime, and I don’t have the skills to make an advent quilt, I decided to go with what I know: Post-Its and doodles.

DIY Advent Calendar
All you need is some poster board, Post-It notes, and markers (maybe stickers too, if you’re feeling crafty)

Continue reading “Free DIY Advent Calendar for Kids”

Bench makeover: before & after

Makeover Monday: Coffee Table

Some people like to rescue stray puppies, I rescue stray furniture. I see it on the street, “FREE” sign hanging limply to the side, waiting for a loving home. So I bring it home, I clean it up, feed it well, love it, and turn it into part of our family.

Because I tend to rescue LOTS of things, I received the edict from my husband not to rescue anything else until I’d rehabilitated what I’d already accumulated. That was incentive enough to get started.

A couple of weeks ago, my sister and I found this coffee table on the curb. It had cool lines, was in fine structural shape aside from the cracked marble top, and just needed some refinishing. So we hauled it home. I had a while to think about it, and when I pulled out the marble, it occurred to me to make an upholstered seat and turn it into a bench for the end of our bed.

Furniture makeover: bench
A stray coffee table on the street becomes a beloved bench in our home.

Continue reading “Makeover Monday: Coffee Table”

I can stop procrastinating tomorrow

Hi, I’m Jen. I’m a Projectaholic.

I was trying to think of new names for my stuff…you know, the social media stuff. Committedgifts is indeed a terrible name, but the only one I could come up with that contained my business name, Committed, and no ridiculous Committed1357xxysz.com. Committed makes a lot of sense for who I am and what I do, but that name as a URL was snatched up some time in the early 90’s. So I’m kind of stuck with “committedgifts”…except.

Twitter and Instagram allow you to change your username. It took the usual brainstorming tricks & techniques to narrow down what my posts are all about. I realize I’m all over the place: fitness, gardening, DIY, kid activities, crafts, thrifting, food, travel. That much diversity is kinda bad in BlogLand, but it’s who I am. I’m addicted to projects.

I kind of suspected this, but it was confirmed when I overheard the cleaning ladies (yes, we have them come twice/month, which is the BEST investment for a marriage) saying, “She’s always working on SOMETHING.” The ‘She’ being ME. I start a TON of projects. You know how it goes–you get an idea to solve a problem. You get excited that the problem can go away. You shop, prep, maybe even start, then…another problem pops up requiring your attention.

For example, in addition to my freelance work, I have about 4 personal projects going at the same time (which I agree is cuckoo):

1) Maintain, Don’t Gain Holiday Challenge (I know you’ve been following along!)

2) Advent activities for the kiddo (a post to come when we’re done):

Free Advent Calendar
Use leftover poster board, Post-Its, stickers, and Sharpies.

3) 10-Minute Post-It
    I take 10 minutes, and a Post-It to sketch out whatever’s on my mind. I post to Instagram and collect those sketches (and friends’ sketches) on a Pinterest board. This is more of a side project I started to get the cobwebs out. A whole large page seems to be a little intimidating, but limiting the size and amount of time seems to make me loosen up. #10MinutePostIt

I can stop procrastinating tomorrow
I feel like this every day.

4) And of course, yesterday, I decided to paint the dining room and the socket covers so we look like we have a big girl house.

Fresh paint
Nothing looks sweeter than a fresh coat of paint.

Oh yes, and there are still Christmas gifts for friends, our annual holiday card, and probably another organizing project lurking in the darkness…So. I had to admit it. As someone addicted to projects. I am Jen. And I’m a Projectaholic.

Now you can follow me on Instagram (@projectaholic) and Twitter (@projectaholic). And you can still like Committed on Facebook. 🙂

Are You Orna-Mental?!?

I don’t know if you get a little freaked out by figuring out appropriate gifts for everyone, but I do. The big question on my mind this week was what to do for my daughter’s daycare class.
I tend to get a little OCD and go overboard for acquaintances, which I’ve learned can come off as overbearing or even overwhelming. Trying to come up with something that’s kind, thoughtful, dietary-friendly, not too difficult to make, but not boring is tough!

DIY ornament gift
PROS: cheap, easy, non-allergenic, kid-helpable, non-denominational. CONS: None! Especially if you love glitter on everything!

It hit me in a flash: initial ornaments! At JoAnn fabrics, they have cute balsa wood letters for $1.35. I picked up some sparkle paint, purple glitter, and gold cord for hanging. The only real work was drilling the holes, which I did while kiddo was at school. The backs splintered a little around the holes, but filled in nicely with glitter! So we painted, glued, and glittered for about 10 minutes, and were DONE! After it dried, I tied on the gold cord with a simple gift tag (left over from my business card project). Voila! Glitter bombed, but a simple gift for any denomination.
What are your favorite mass gifts you like to give (or have received)?

Gift tag business cards.

Crafted Connections (and a DIY Business Card Tutorial)

I should be a self-help junkie. I love going to events, getting sparked by a lecture, meeting fascinating people and gleaning knowledge from their stories. But I’m not a kool-aid drinker…yet. Last night I attended Crave’s Urban Campfire, where incredible women opened their hearts and shared their vulnerability to empower the rest of us. (Okay, I sound like a kool-aid drinker for sure.)

I want to process some of what I learned in that event before I write about it, so I thought I could at least share with you my process for making my own business cards.

But I can get cards on VistaPrint for like free, right? Yes, but as a designer and whatever else I am (still figuring that out…cough…cough), it doesn’t reflect ME to do that. I make stuff. I solve problems.  If you are in a creative industry, or thinking about getting into one, perhaps you can think beyond the card too!

I also disobey the rules and change the look of my cards and online presence ALL THE TIME. I don’t think there’s anything wrong with it, since to be honest, I’m still figuring out who I am and what I do (or really, what skills I have that I want to sell). So, enough kool-aid, on to the tutorial…

I decided a few months ago to try using stickers as my card. I remember seeing a designer who had taken other peoples’ old business cards and slapped a sticker with his information on them–the ultimate in recycling. It appealed to my inner greenness and opened up some possibilities.

So I whipped up a pattern, printed on both sides of Bristol board, then printed stickers on the full-sheet Avery labels, and made these:

First try at DIY business cards
Too much cutting, not enough time.

Cute, but SUCH a time-consuming venture. Plus, the white of the sticker was a little transparent, which meant that I could see the pattern through the logo side. It wasn’t exactly right for me. My final complaint? The pattern wasn’t as vibrant as I wanted. I like to think of Committed as colorful and fun. This fell a little short. Luckily, DIY means small quantities, so no harm, no foul.

Moving on.

Upcycled business cards.
Next attempt: upcycled pulpboard with ribbons.

I had a bunch of pulpboard lying around, and figured, hey, let’s use it! So I went bolder with the colors, and added a ribbon, since hey, it’s cute, and my domain name is Committed GIFTS. Gift tag, get it?

Even though I LOVED how these turned out, they were a colossal pain in the ass. (That’s P.I.T.A. for short). I used the same Avery labels, which required tons of slicing. The cardstock was so thick, it took several passes to cut, then the ribbons were slippery. In the end, they were so thick, I could only gracefully carry a few around at a time. It wasn’t worth it.

FINALLY…

I figured it out. Buy PRE-CUT stuff, Smarty! The cutting was the biggest time-suck. You can learn from my mistakes! This is easy, and really cute. Plus, you could do this for actual gift tags, mommy cards, basically anything. Easy easy easy.

Materials (I’m linking to these on Amazon, but they are not affiliate links, for reference only):

I have 10 years in graphic design and mockup experience. All of these tools are incredibly useful in making a clean, crisp product. It takes practice and patience, but when you get the hang of cutting and folding carefully, you can make it look like it wasn’t handmade.

Tips:

  • Alwaysuse a fresh blade. As soon as they start to get dull, swap them out. They tear your precious printouts and take more of your time. Isn’t it worth the extra 10 cents to do it right?
  • Hold the ruler upside-down (smooth side down) and press down hard to get a perfect straight edge for cutting and folding. When you place it cork-side-down, the gap allows your blade to travel side to side a little. If you make more than one pass, you end up with slivers of paper.
  • Be gingerly. Don’t cram your blade in and go for it. Take a couple of light passes to make your cuts. You’ll get a feel for how deep to go to get a nice edge.
  • Practice printing on regular paper to make sure everything lines up. Then set your print settings to “highest quality” and make sure you’re feeding the sticker sheet properly.

Tutorial:

Print your stickers first. Use high quality settings.

To fold the stickers in the right place, line your ruler up with the fold and stick it through the paper at the top and bottom.

Mark the fold.
Mark the fold on your printout.

Flip the sheet over, line the ruler up again, and score the page. Hold your ruler down tight, and press the bone folder (or credit card) against the edge. Take a few passes to get a nice score.

Score the back by pressing down with the bone folder. Use the ruler as a guide.

Keep that ruler in place! Take your bone folder and slide along the underside of the sheet to start to fold it up. Do this in several steps, as folding too quickly can cause the printout to crack.

Folding.
Take several passes to fold the sheet.

Flip over the sheet.

You’ll notice that the edges of the stickers may not have printed. Not to worry, we’re slicing those off.

Hold your ruler down (face down) along the edge to slice. Use your Exacto knife carefully and take 2-3 passes to slice each edge.

Slicing your stickers.
Flip it over, and slice the rounded edges off.
Stickers are prepped.
Folded, trimmed, and ready to paste!

See how helpful that all was? You successfully prepped 20 stickers in just a couple of steps. This was seriously SO MUCH FASTER than how I was doing it before. At this point, I grabbed a stack of tags and sliced off the string that came with them. I didn’t think it added anything (I mean, it’s no magenta ribbon, right?) and moved on to sticking the stickers on the cards.

Okay, now line up the fold of your sticker with the edge of the card. You can eyeball it for centering.

Sticking the sticker to the card.
Eyeball it to center it.

It’s not PERFECTLY centered, but it’s so close. The important part is to not have your sticker hanging off the edge at some weird angle.

Gift tag business cards.
Finished! Gift tag business cards!

And there you have it! I like the unique shape of the tags, and the color shift from front to back. It was tough to decide what to include on the cards, but as you can see, I focused on social media touch points for these.

As I said, these can be for actual gift tags…or even to label your kool-aid.

A final note: I’m not including a template because (a) Avery has the tools you need to design these online or in Word or Illustrator and (b) this was a custom project. Who you are and what you want to say about yourself should be unique to YOU. So go to town! Design something awesome!

Thriftaholism: There is No Cure

Hi, I’m Jen. And I’m a Thriftaholic.

After discovering the awesomeness that is the Goodwill in my new ‘hood, I find myself wandering over there 1-2x/week.  This is an addiction I have no desire of curing, however. I abide by a few rules in my prowling:

– Will it serve a function in our home?

– Is it reasonably priced? (Sometimes they price things almost the same as, if not more than, retail).

– Will it add clutter or will it bring joy?

I believe I’ll be posting more and more about my finds. I’m realizing that I am a staunch believer in thrifting. I feel it encourages creativity and responsibility by reducing waste and requiring some thought about how to use something in a new way.

Case in point: my new Moroccan-inspired side table.

I found this gorgeous brass tray from Turkey for $6.99, and immediately thought: wouldn’t this make a great table top?

Brass tray makes a table top.
Tray chic! Just needed a little TLC.

Continue reading “Thriftaholism: There is No Cure”

Silicone ice molds

Ice Fishing, Bath-Style

The last week has been a torrent of tears at bathtime. My husband’s mostly…just kidding…kind of.

But seriously, for some reason, the kiddo just keeps FREAKING OUT when it’s time to splash around. And we need to do it–with the hotter Seattle days, sweat and sunscreen and general toddler messiness require daily hair washing. Or at least rinsing. Anyway, we took a nice long walk this weekend and stopped in an adorable gift shop to browse. I saw these fish ice cube trays and it hit me: I could make colored ice fish for the bath! Thunder struck, the heavens opened, and I was overjoyed at the prospect of a peaceful bath that night.

Silicone ice molds
Water, food coloring, and silicone molds are my gateway to bathtime happiness.

Continue reading “Ice Fishing, Bath-Style”

Scarf storage solution

A Pain in the Neck: Scarf Storage

Update:

Welcome Pinners! I had no idea this idea would go viral. Thanks for visiting my blog & check out my other well-pinned posts on Traveling with a Toddler  and Family Fitness. Also, follow me on Pinterest, Twitter, and Instagram, or “like” the Committed Facebook page to keep up with new posts!

______~_______~______~_______~______~_______~______~_______~______~_______~_______

I need to preface this post with a statement: I don’t want to pretend that I’m super organized. I’m typically pretty scatterbrained. Case in point: this morning I got the kiddo packed up and ready for school, strapped into the carseat, then I realized I FORGOT TO PUT ON ANY SHOES. Mmmkay? Sure, kiddo had her snacks, her lovey, a toy, extra shoes for water play, diapers, but none of that matters if mommy shows up at daycare barefoot. Sheesh.

Anyway, this post is about getting the craziness under control. As I was unpacking in the new house, I discovered that I have a TON of scarves. I felt like a two-bit magician yanking an endless array of scarves from my magic hat. Except that magic hat was actually a couple of boxes, 2 drawers, and God knows where else I was stashing them. They were a wrinkled mess and I could never find the one I wanted when I wanted it.

In the new house, I want to stick to the mantra “A place for everything and everything in its place,” in the hope of maintaining a wee bit of sanity. Now that we actually have space and tons of storage, there’s no valid excuse to strew crap around the house (not that there was an excuse in the old house either!)

Scarf storage solution
Tame the pain in the neck for under 10 bucks.

So, I bucked up and bought a cafe curtain rod at Target for about $7 (like this one). If your space is narrower, you can also do this with a tension rod. The weight of your scarves ends up being comprable to a shower curtain. (We used a tension rod in my daughter’s closet for the last 2 years and it held up well with the baby clothes!)

It took about 10 minutes to mount to the wall and hang all the scarves. Now it’s a cute blast of color in the closet and I can find that perfect scarf when I need it! Sanity preserved! Now if I can remember my shoes…

Start with crayons

The Easter Bunny Doesn’t Poop Chocolate

I know that a mythical bunny leaving candy-filled plastic eggs on your lawn has nothing to do with religion. But it’s a tradition that I love and I love that my daughter is old enough now to get into it. What I don’t want her getting into is a sugar-induced-toddler-frenzy ending in some form of tragedy. So even though I bought 12 different kinds of Easter candy to decorate cupcakes, very little of it is going into those aforementioned eggs. I’m stuffing those plastic vessels with fun non-chokeworthy gifts, including hair ties, stickers, and DIY crayons.

This post is about the crayons I attempted to make. Some were successful. Some were pitiful.

I should have found these tutorials (SheKnows, MakeandTakes, GabrielsGoodTidings) before starting, but as usual, I thought I’d just figure it out and forge ahead.

But here’s what I did:

1) You’ll need: crayons, a silicone mold (for making confections), a ziploc baggie, a cookie sheet, and a blunt object (to smash crayons). Optional: exacto knife to slit crayon peels. And you’re smart people–you know which to give your kids and which to keep away from them.

2) Preheat your oven to 225-250.

3) Follow along:

Start with crayons
Start with crayons, broken or whole.
Peel your crayons.
Peel. This can be made easier with an exacto knife.
Crush 'em. I just put them all in a baggie and smashed with a meat tenderizer. You can keep colors separate if you like.
Crush ’em. I just put them all in a baggie and smashed with a meat tenderizer. You can keep colors separate if you like.
Froggy mold for DIY crayons.
This froggy mold came from Japan, but you can get silicone molds at Ikea.
Melt the crayons.
Melt ’em. Fill the molds completely. This was about 5 minutes into baking.
Fill your molds completely.
I tried adding more bits halfway through. I do not recommend this. Just fill them enough at the beginning.
Some good, some bad, some ugly DIY crayons.
Some came out, some did not. Read my tips below.

Basically, I’d recommend filling your molds overfull. Don’t let them melt to liquid because the colors get really muddy. It’s fun when they swirl a bit, but too much and it’s not as pretty. But what toddler really cares? Right? And don’t (like me) try to add more chunks halfway through to make the molds full. Basically, you’ll have a liquid mess at the bottom, and crayon chunks on top.

Overall, this was super easy. It took about 15 minutes altogether and could be fun to do with the kiddos.

We’ll see what mine thinks of the Easter bunny after she opens her eggs!